Do you know what is the free tool that can help to increase your site traffic and online earnings?
The free online tool called Google Analytics 4.
Many of us have overlooked this software, is most probably it is free.
But if you know better, Google Analytics 4 is an invaluable source of information, which you can explore and exploit to your benefits.
Google Analytics 4 web analytics service offered by Google that tracks and reports website traffic.
It provides information on the number of visitors to your site, where visitors are coming from, how much time they spend on your site, and the nature of their visit.
It collects anonymous and aggregate data about how your website is being used.
Google Analytics even offers real-time performance, how pages perform over time, your conversion rate for e-commerce campaigns, and more.All you need to do is just paste the Google Analytics 4 tracking snippet into your website’s source code.
This free tool that Google provides to help you understand, analyze, and improve your website traffic; thus your online earnings as well.
You should take advantage of this freely available tool to assist you do come up with more suitable content to suit your traffic.
You should spend time at Google Analytics 4, monitor and analyze the findings and then tweak your online content accordingly.
Instead of wasting time adding more content, which might not be favorable to your site visitors.
Find out from the Analytics data, which published posts are popular and how you can exploit further to gain more attention and earnings.
Free Tool To Increase Site Traffic And Online Earnings
Now, you know the importance of Google Analytics, let me share with you how to install this free solution to your blogs or websites.
How To Add Your Site To Google Analytics
PART ONE: Set Up Google Analytics Account
1. Go to Google Analytics.
2. You will be asked to log in with your Google account. If you already have a Google or Gmail account, then you can use that to sign-in.
Otherwise, you can go ahead and create a Google account for yourself.
3. Once you sign-in with your Gmail account, you will see the ADMIN page of Google Analytics.
4. First you need to create an account.
5. You click on "+ Create Account" button.
6. It will provide you a box where you are required to create an "Account name".
Note: You can create any name you prefer, as it is to indicate that particular site analytics account.
7. The "Account Data Sharing Settings" at the bottom, leave it as it is.
8. Click on the "Next" button.
9. Now click on the blue color "+ Create Property" button.
Note: Property means a website/blog, mobile app, or internet-connected device.
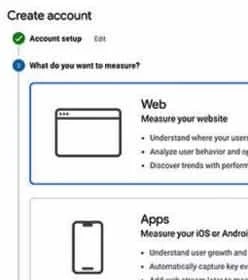
10. It will open a page with three options for you to choose: Web, Apps and Apps and web.
11. For this tutorial, I choose the first one "Web" by clicking on the circle on the right side of the page.
Note: By default, it has already set for "Web".
12. Click the "Continue" button.
13. It opens another page for you to fill up four items: website name, website URL, industry category and time zone.
14. Scroll down and click on the "Create" button.
15. It opens a new page, with the "Property" showing the site name, together with Tracking ID and Tracking Code at the bottom of the page.
16. To close your Google Analytics account, click on your Google account icon on the top right hand corner.
17. A menu drops down, click on "Sign out".
18. That's how you add your site to Google Analytics.
Note: If you want to continue adding the Analytics tracking ID or code to your site, then don't close the account yet.
You just skip directly to PART THREE below to continue adding the Analytics ID or code to your site.
PART TWO: Get Google Analytics Tracking ID Or Code
If you have already closed the Analytics account, and now you want to install the tracking ID or code to your site.
This guide is to show you where and how to get your tracking ID or tracking code.
This is what you do:
1. Log into your Google Analytics account.
2. Select the website for which you need the tracking code.
3. Click on "Admin" (gear wheel icon) located at the bottom left side of the page.
4. In the "PROPERTY" column, click on "Tracking Info".
5. It will drop down a list, then you click on "Tracking Code".
6. Now, you can see the tracking code under the "Website Tracking" section.
It looks something like this:
<script async src="https://www.googletagmanager.com/gtag/js?id=UA-
XXXXXXXX-1"></script>
<script>
window.dataLayer = window.dataLayer || [];
function gtag(){dataLayer.push(arguments);}
gtag('js', new Date());
gtag('config', 'UA-XXXXXXXX-1');
</script>
PART THREE: Add Tracking Code To Sites
For WordPress Users:
There are various different ways to add Google Analytics to WordPress sites.
For this tutorial, I just show you one easy method, by adding the tracking code to the header.php file.
Note: Before you get started, make sure to back up your WordPress theme.
In case something goes wrong, you can safely revert it back.
1. Log in to your WordPress Dashboard.
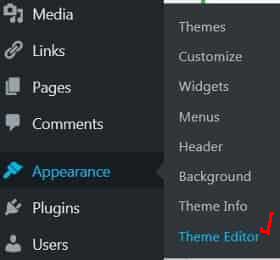
2. Move you mouse cursor over to "Appearance".
3. A menu box drops down, click on "Theme Editor".
4. Now click on "Theme Header" (header.php) file.
5. It is on the right-hand side of the page, under "Theme Files".
6. Paste the tracking code inside the code, before the closing </head> tag.
7. Click "Update File".
8. That’s all you do.
For Blogger Users:
To add Analytics tracking ID to Blogger is very easy.
This is what you do:
1. Log in to your Blogger account.
2. Click on "Settings" on the left side of the page.
3. Next you click on "Other" from the list of setting options.
4. Scroll down until you see "Google Analytics".
5. Type in your Analytics tracking ID in the box provided.
Note: The Analytics tracking ID format: UA-XXXXX-XX.
6. Click "Save settings" button at the top right hand corner of the page.
7. You've successfully add your Google Analytics tracking into your Blogger blog.
Note: It can take up to 24 hours for data to show up in Analytics.


