This tutorial shows you how to back up WordPress database with phpMyAdmin.
By the way, there are other ways to back up your WordPress MySQL database, which include WordPress built-in tool, free plugins, mysqldump utility, cron jobs or paid backup service.
To avoid confusion, I will show you the other options in each different posts.
This post is only how to a fully backup your WordPress database manually with phpMyAdmin.
At then end of this post, I include a link to the post showing you how to restore this backup with phpMyAdmin.
Let's do it now.
Backup WordPress Database With phpMyAdmin
1. First sign into your web host account. (BlueHost, DreamHost, FreakServer, HostGator, etc)
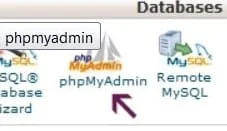
2. Go to cPanel and scroll down to look for phpMyAdmin in the Database or Databases section.
3. Click on it.
4. If you have a few blogs or websites, then you have several databases listed on the left side of the page.
5. You can either click on the sites listed on the left side of the page or click on Databases tab on top of the page, which will also show you a list of your sites.
6. If you have several sites, click on the first one.
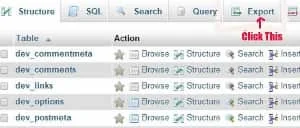
7. It will open a new page showing; a list of tables in the Structure tab.
8. Click on the "Export" tab on top as shown below.
9. It will open a new page, showing you two export methods:
< Quick - display only the minimal options
< Custom - display all possible options
10. If you do not know about customizing it, then just go for the "Quick" option. By default, it is already set for you in the Quick- display only the minimal options .
11. Scroll down and click the "GO" button
12. A box will pop up.
13. Select "Save File" and click the "OK" button.
14. Then another box will pop up for you to choose where you want to store this database backup file.
Note: You should store at least two copies of your backup database.
First copy: Store it on the same computer which you are using now.
It is for handy purpose. You can quickly replace a working database that becomes damaged.
Second copy: Store it in an external hard drive.
In case there is a major problem with your computer, then you still have the database backup in hand.
15. For those of you who want to use the custom option, then click on "Custom".
16. First it will show all your tables in your WordPress database as selected.
17. If there are any tables that you would like to exclude from export, then you can deselect them.
18. If you are not sure, then it is better to keep them all selected.
19. Scroll down to the "Output" section.
20. Make sure the "Save output to a file" option is selected.
21. For the "Compression" setting, you can select either zipped or gzipped option.
22. The rest of the sections, leave them as they are.
23. You just scroll down to the bottom of the page and click on the "Go" button.
24. phpMyAdmin will now export the database in zip or gzip file as requested.
25. It will take some time, depending on the size of your database.
26. Once it has completed the exporting, you can see the file name ends with .sql.
Yes, you have done it.
Now you have safely backed up your WordPress database.
* Here is how to restore your site back from WordPress database backup with phpMyAdmin which you have just learn above.
Note: If you have a big file, you may encounter problem exporting/importing it via phpMyAdmin.
The maximum size for a sql upload via phpMyAdmin is 50MB.
This is the guide on how to export and import large database MySQL with phpMyAdmin.


