This is how to fix date dateModified Field Error in Blogger tip that definitely works.
When you check with Google Structured Data Testing Tool, you will notice this warning error in orange color:
dateModified The dateModified field is recommended. Please provide a value if available
Many Blogger users have problem getting rid of this structured data markup warning.
But actually it is not that difficult to fix this schema markup error.
This is another post from the DiGiztal Blogspot Blogger Tips series.
Here are two methods to get rid of this dateModified field warning in the data markup test result.
Remove dateModified Field error in Blogger
Method One:
This is what you do:
1. Sign into your Blogger account.
2. Click "Theme".
3. Then click "Edit HTML".
4. Look for this line of code:
<div class='post hentry uncustomized-post-template' itemprop='blogPost' itemscope='itemscope' itemtype='http://schema.org/BlogPosting'>
NOTE: If some of you CANNOT find the above code, because it could have been deleted and replaced by another code when you fixed another structured data error called "mainEntityOfPage" warning.
In that case, look for this replaced code:
<div class='post hentry' itemprop='blogPost' itemscope='itemscope' itemtype='http://schema.org/BlogPosting'>
5. Now copy the following code and paste it BELOW the code which you found above at #4.
<meta expr:content='data:post.timestamp' itemprop='datePublished'/
<meta expr:content='data:post.lastUpdatedISO8601' itemprop='dateModified'/>
6. When it is done, it should look like this:
<div class='post hentry uncustomized-post-template' itemprop='blogPost' itemscope='itemscope' itemtype='http://schema.org/BlogPosting'>
<meta expr:content='data:post.timestamp' itemprop='datePublished'/>
<meta expr:content='data:post.lastUpdatedISO8601' itemprop='dateModified'/>
Or like this:
<div class='post hentry' itemprop='blogPost' itemscope='itemscope' itemtype='http://schema.org/BlogPosting'>
<meta expr:content='data:post.timestamp' itemprop='datePublished'/>
<meta expr:content='data:post.lastUpdatedISO8601' itemprop='dateModified'/>
7. Click the "Save theme" button.
I hope this trick would remove the dateModified field error for Blogger users.
METHOD TWO:
For this method, first you have to check where do you put your date and/or time in your blog post or web page.
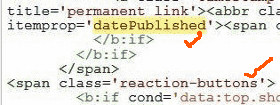
It is because you need to look for the word "datePublished" in the html template.
There are TWO "datePublished" in html.
So you need to know precisely which ONE of them is the one that indicate your blog post date and/or time.
As for my example here, the blog post time/date is near the Reaction Buttons widget.
So I look for the set of code with the word "datePublished" which has the Reaction Buttons code nearby.
This is the set of code where I need to add another set of similar code to it.
1. Copy out this full set of code from the opening <span> tag up to the closing </span> tag:
<span class='post-timestamp'>
<b:if cond='data:top.showTimestamp'>
<data:top.timestampLabel/>
<b:if cond='data:post.url'>
<meta expr:content='data:post.url.canonical' itemprop='url'/>
<a class='timestamp-link' expr:href='data:post.url' rel='bookmark' title='permanent link'><abbr class='published' expr:title='data:post.timestampISO8601' itemprop='datePublished'><data:post.timestamp/></abbr></a>
</b:if>
</b:if>
</span>
2. Then paste this set of code on your NotePad first.
3. Change the word "datePublished to "dateModified". (highlighted in yellow)
4. Then add: style='display:none' (highlighted in white) after the word dateModified.
5. The whole thing should look like this:
<span class='post-timestamp'>
<b:if cond='data:top.showTimestamp'>
<data:top.timestampLabel/>
<b:if cond='data:post.url'>
<meta expr:content='data:post.url.canonical' itemprop='url'/>
<a class='timestamp-link' expr:href='data:post.url' rel='bookmark' title='permanent link'><abbr class='published' expr:title='data:post.timestampISO8601' itemprop='datePublished'><data:post.timestamp/></abbr></a>
</b:if>
</b:if>
</span>
<span class='post-timestamp'>
<b:if cond='data:top.showTimestamp'>
<data:top.timestampLabel/>
<b:if cond='data:post.url'>
<meta expr:content='data:post.url.canonical' itemprop='url'/>
<a class='timestamp-link' expr:href='data:post.url' rel='bookmark' title='permanent link'><abbr class='published' expr:title='data:post.timestampISO8601' itemprop='dateModified' style='display:none'><data:post.timestamp/></abbr></a>
</b:if>
</b:if>
</span>
6. Then click the "Save theme" button.
RELATED TIPS:


