When you sign up for a web hosting plan, a FTP account has already created for you to use.
If you are not sure about it, just contact your web hosting administrator to help you out.
But if you want to have an additional FTP account, you can set up one in the Control Panel.
In fact, you can add multiple FTP accounts for each user.
Create Additional FTP Accounts In Control Panel
Here is a clearly explained and easy-to-understand guide on how to create additional FTP accounts in the Control Panel (cPanel).
1. Log in to your cPanel.
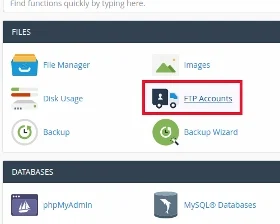
2. Click on "FTP Accounts" icon found in the "Files" section.
3. It opens a new page with the remark: "Add FTP Account".
4. For "Log In", enter a new username of your choice.
5. The username will automatically combined with your primary domain name.
6. For example, if you enter joeman in "Log In", the FTP Username will be: joeman@yourdomain.com
7. For the "Domain", you select a website/blog for this new account.
8. For "Password", enter a strong password.
Note: You can use the provided "Password Generator" to help you to come up with a unique strong password.
9. For "Password (Again)", enter the same password to validate it.
10. The "Directory" field is for you to set to the specific folder you want other users to access.
11. They can only access all files and sub-folders within the specific folder as set in the "Directory" field. But not to all the other files or folders in your server.
12. You would notice that the Directory box will automatically filled up for you after you have entered your new username and selected the Domain.
13. You don't need to use this settings. You can delete them away replace it with the particular folder which you want to give access to other FTP users.
14. They can only access to the folder at the end of the file path which you specified in the "Directory" box.
15. For example: if you specify /public_html/ login as the folder path, the FTP account will open /login but will not allow anyone to navigate to any other folder, including /public_html.
16. If want to give the other users access to the entire website in the server, you would delete everything except the forward slash '/' in the box.
Note: If you set up FTP account for yourself, then you leave the "Directory" box blank.
Then you can access to all domain and sub-domain files.
Note: Here is another way you can specify a specific directory for FileZilla to open in a remote server after it connects.
For example, if you prefer to have an FileZilla to access the public_html directory by default.
This is what you do:
1. Launch FileZilla.
2. Go to "File" and click on "Site Manager...".
3. A box will pop up.
4. Click on the "Advanced" tab.
5. In the "Default remote directory:" text box, type the full path to the directory that you want FileZilla to open.
6. For example, to open the public_html directory, type: /home/username/public_html.
7. The username is your cPanel username.
8. Click the "Connect" button.
9. A short while, the connection should established.
17. The "Quota" field is for you to set the limit of how much the user is able to download or upload to your hosting space.
18. You can select "Unlimited".
19. Finally click on the "Create FTP Account".
20. Now you should see your new FTP account in the FTP accounts section below
21. At this section you can modify or completely remove your FTP account.
You can also change the password or quota of your FTP account and configure a FTP client such as FileZilla, Core FTP or Cyberduck.
22. That's how you set up additional FTP accounts in cPanel or Control Panel.


