One important way to prevent your Adsense account being abused, is to use the Site Authorization.
What Is Site Authorization
It is an optional precaution feature for Adsense publishers.
With Site Authorization, you can identify your verified websites or blogs as the only sites that are permitted to use your Google ad code.
It is a good way to prevent malicious use of your Adsense ad code by other people.
They copy your ad code and paste it on their sites which could violate Adsense policies.
When that happens, you will receive a policy warning.
If you do not take action, you could even lose your Adsense account for good.
How Does Site Authorization Help
If you have the Site Authorization feature enabled, should a URL displaying your ad code is NOT on your list of verified sites ads, the ads will STILL show in your URL and impressions and clicks will be recorded.
However, advertisers of those ads will NOT be charged.
In other words, you WON'T be earning any money for the unauthorized site.
In addition, you won't receive any warning, and you won't be penalized for any policy violations.
Note: If you don't add a site to your list of verified sites, and you place your ad code on it, ads will still continue to appear on the site.
But you won't earn a single cent from Adsense.
Therefore, enable this useful feature called Site Authorization and keep enjoying the valid income from Adsense.
How To Authorize Your Websites Or Blogs
Here is a simple step-by-step procedure how to enable or setup your Site Authorization:
1. Sign in to your AdSense account.
2. On the left side of the page, click on the three short parallel horizontal lines (aka hamburger button or tribar).
3. It will drop down a menu. Click on "Settings".
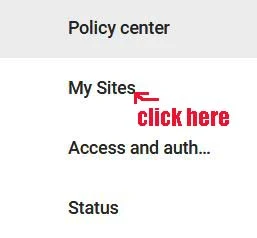
4. Then another drop-down menu. Click on "My sites".
5. It will open a new page.
6. Click on the three dots on the right side of the page.
7. A box pops up. Click on "Site authorization".
8. Another bigger box pops up.
9. Next to "Only allow verified sites to use my ad code", there is a short light grey color slider switch.
10. Hold your cursor over it and click it.
11. Instantly the slider will move to the right side and change to green color.
12. Then click on "SAVE" below.
13. Now you have enabled the Site Authorization settings.
That's all you need to setup Site Authorization, to authorize your verified sites to display Google Adsense ads.
Sites that you own that are already serving ads using your publisher ID are automatically added to your site list.
Initially your sites are classified as "unverified".
You need to confirm your ownership of these sites by verifying them.
Here is how you do it:
How To Verify Your Site
1. Sign in to your AdSense account.
2. On the left side of the page, click on the three short parallel horizontal lines (aka hamburger button or tri-bar).
3. It will drop down a menu. Click on "Settings".
4. Then another drop-down menu. Click on "My sites".
5. It will open a new page.
6. Under the "Sites" section, you can a list of sites.
7. To claim and verify your site, click on the the Down arrow.
8. The selected site will be isolated from the rest and boxed up by itself
9. Next to "Verified site", there is a grey color slider switch with a tick sign.
10. To verify it, you click on the slider switch.
11. Instantly it will turn green color together with a green color tick sign.
12. Now you have verified your sites.
For those of you who have websites or blogs that are NOT currently serving ads using your publisher ID, you need to be manually added to your site list.
By adding your sites, they get a status of "verified", so you don't need to confirm your ownership of them.
Here is how to do it manually.
How To Add A New Site To Get Verified
1. Sign in to your AdSense account.
2. On the left side of the page, click on the three short parallel horizontal lines (aka hamburger button or tri-bar).
3. It will drop down a menu. Click on "Settings".
4. Then another drop-down menu. Click on "My sites".
5. It will open a new page.
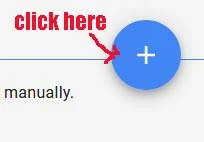
6. Click on the big blue color dot with a white plus sign in the middle.
7. A box pops up, title "Add a new site".
8. Place your cursor over "New site URL (example.com)" and click on it.
9. It will change to blue color and the text will change to "New site URL (example.com)".
10. Now type in your URL or the domain name in the space provided.
11. Then click on "ADD SITE" below.
12. That is all you need to do.


