Find out how to create Blogger sitemap just like the one found in many WordPress sites.
This is NOT the XML Sitemap which Google automatically creates it for you in your root directory for you.
Since way back 2015, you do not have to create and submit your own Blogger sitemap to Google anymore.
If you use Blogger domain, the sitemap URL is:
https://yourblogname.blogspot.com/sitemap.xml
If you use your own custom domain, the sitemap URL is:
https://www.yourblogname.com/sitemap.xml
The problem with Blogger sitemap is that some of your older blog pages are missing in the default XML sitemap file; so it may never get indexed in search engines.
- Here is the tutorial how to add Blogger XML sitemap.
How to create Blogger sitemap page
But what I am going to show you here is how to create a Blogger Sitemap Page.
It is a like a table of content of your blog.
It will show you a page listing all your blog posts with bullet points in front of the post titles.
It is similar to the what you can see in it in many WordPress sites.
To see how it looks like, click on my sitemap page, as stated below the blog.
This is how I do it:
STEP #1: Create Blogger sitemap page
1. Log into your Blogger Account.
2. Click 'Pages' and then click "+New page".
3. For the 'Page title', just type: Sitemap.
4. Then click on the pencil icon on the left side of the text editor (the empty box where you write your blog post).
5. A context menu pops up with: "HTML view" and "Compose view".
6. Click on "HTML view".
7. Now paste this set of code as shown below into the empty text editor.
<script type="text/javascript">
var startIndex = 1;
var maxResults = 100;
function sendQuery12()
{
var scpt = document.createElement("script");
scpt.src = "/feeds/posts/summary?alt=json&callback=processPostList12&start-index=" + startIndex + "&max-results=" + maxResults;
document.body.appendChild(scpt);
}
function processPostList12(root)
{
var elmt = document.getElementById("postList12");
if (!elmt)
return;
var feed = root.feed;
if (feed.entry.length > 0)
{
for (var i = 0; i < feed.entry.length; i++)
{
var entry = feed.entry[i];
var title = entry.title.$t;
for (var j = 0; j < entry.link.length; j++)
{
if (entry.link[j].rel == "alternate")
{
var url = entry.link[j].href;
if (url && url.length > 0 && title && title.length > 0)
{
var liE = document.createElement("li");
var a1E = document.createElement("a");
a1E.href = url;
a1E.textContent = title;
liE.appendChild(a1E);
elmt.appendChild(liE);
}
break;
}
}
}
if (feed.entry.length >= maxResults)
{
startIndex += maxResults;
sendQuery12();
}
}
}
sendQuery12();
</script>
8. Click the orange color 'Publish' button.
9. You have already created a Blogger Sitemap Page.
10. Now click on the "View" link of underneath "Sitemap".
11. You should see a bullet point list page showing your blog posts titles, similar the the one below:
You have successfully create your Blogger Sitemap Page, now it's time to place it on your homepage.
STEP #2: Set Sitemap page link
Now you want to place the link of this newly-created sitemap page on your blog homepage.
The link should look like this:
<a href="https://yourbogname.blogspot.com/p/sitemap.html">Sitemap</a>
You can set it at the bottom of the homepage (like what I have done with this blog), or you can place it at the side bar.
Sitemap Page At The Bottom
1. You can add the sitemap page link at the bottom of your blog.
2. For this, go to your Blogger dashboard, click "Theme" on the left side of the page.
3. Then click the white reverse triangle next to the orange color "CUSTOMIZE" button.
4. A menu drops down.
5. Click the "Edit HTML".
6. It opens a page of HTML code.
7. Press "Ctrl" and "F" keys.
8. The "Search:" box will appear at the top left side of the code.
9. As for my site, it is located at "footer-outer".
10. Paste the "Sitemap" link among the code, then click on gray color "Preview Theme" (eye icon) at the top right corner.
11. Check whether the location is where you want it to be.
12. When you are satisfied with the location, then only click "Save" (diskette icon).
Sitemap Page At The Side Bar
1. Click on "Layout".
2. Go to one of your sidebar of your choice, and click on "Add a gadget".
3. A box pops up, scroll down until you see the red color "Pages".
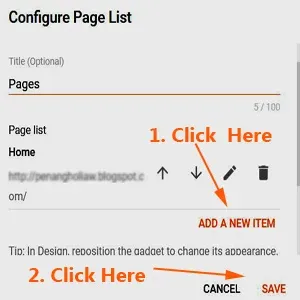
5. Another box called "Configure Page List" will pop up.
6. You can see your "Homepage" is already listed there.
7. To add in this Sitemap Page, click "ADD A NEW ITEM".
8. A new box pops up.
9. The first line "Page name", type: Sitemap.
10. The second line "Page URL", type: https://yourbogname.blogspot.com/p/sitemap.html,
11. Then click "SAVE".
12. Now you can see the "Sitemap Page" listed below "Home".
13. Finally click "SAVE" at the "Configure Page List" box.
14. That's all. Now you can see the word "Sitemap" on your sidebar.
You can remove or delete the title "Pages" for this list.
This is how you create the Blogger Sitemap Page for your Blogger site.


