This a detailed step-by-step easy-to-follow tutorial on how to embed subtitles to video files using VLC media player.
The other day I wanted to watch this 2014 French 'naughty' thriller video, titled "Blue Room" (La Chambre bleue), but it comes without the English subtitles.
By the way, you can listen to BBC radio play "The Blue Room" by George Simenon in Internet Archive.
In order to enjoy this adult French movie with English subtitles, this is how I embed or add English subtitles to the movie.
How to embed subtitles with VLC Media Player
The two ways to add the subtitles to your video files:
- temporary just for a one time viewing
- permanently embedded it
Table of Contents:
1. Look for subtitles online
First I have to look for the English subtitles for this French film over at the Internet and download it.
As the subtitle file is zip format, I need to extract the file which end with .srt.
To do that, first I click the .srt file.
Then I click "Extract To", as shown below.
For instance if you want to save it on the desktop, then click on "Desktop".
Then click on the "OK" button below.
After that you should see the .srt file on your desktop.
NOTE: Here is a list of subtitles websites.
2. How to embed subtitles to video temporarily
Click on the movie and let it play on the VLC media player.
While the movie is playing, click "Subtitle" at the toolbar.
Then click "Add Subtitle file..."
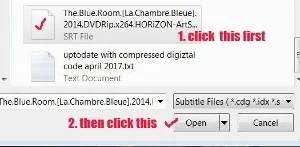
A box will pop up, and then locate the subtitle file (end with .srt) which you have just saved.
Click on it and then click on the "Open" button below.
Instantly now the movie which is playing has the subtitles on it.
Now you can enjoy the movie with the subtitles.
If you want to the earlier part of the movie, you can just hover your cursor over the running time track to the beginning of the show and click on it.
But if you want to permanently embed the subtitles or hard-code to the movie, then this is how you do it.
3. How to embed subtitles to video permanently
First open the VLC media player.
Click "Media" on the menu bar located on the top left hand corner.
Scroll down your cursor until "Stream..."
Click on it.
A box will pop up.
Click the "Add..." button.
Another box pops up.
Look for your movie video file. (Not subtitle files!)
Click the movie file.
Then click the "Open" button.
Now you should see the movie file listed in the smaller box next to the "Add..." button.
Next, click the tiny box next to "Use a subtitle file".
A small tick symbol will appear inside the tiny box.
Now click the "Browse..." button.
A box pops up.
Locate and click your subtitle file which ends with .srt.
Then click the "Open" button.
Now you can see the subtitles file listed in box next to "Browse" button.
Click the "Stream" button.
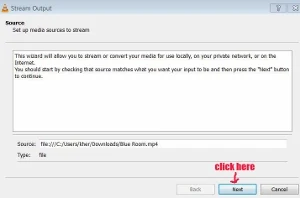
Another box will pop up.
Click the "Next" button.
Another box pops up called "Destination Setup".
Click the "Add" button.
It jumps to the "File" tab. Click on the "Browse..." button.
Another box pops up.
Now choose where you want to save the newly created file.
Click one of the options on the left side of the box. (Desktop, Downloads, Libraries, etc)
Now type in a new name for your video in the blank space next to "File name".
Then click the "Save" button.
The same "Destination Setup" box pops back again.
Now click the "Next" button.
Another box pops up.
Make sure the remark "Activate Transcoding" is checked (meaning there is a tick symbol in the small box next to it).
Next click the "edited selected profile" (wrench and spanner symbol).
An overlapping box pops up.
At the "Encapsulation" tab, make sure it is set at: MP4/MOV.
Then click "video" tab.
Make sure the word "Video" is checked (with tick symbol) and the remark "Keep original video track" is NOT checked.
The "Codec" is set at: H-264 (Refer to the Profile Name as set above)
Next, click "Audio codec" tab.
Make sure both "Audio" and "Keep original audio track" are checked. (with tick symbols in the tiny boxes)
Now click the "Subtitles" tab.
Make sure both "Subtitles" and "Overlay subtitles on the video" are checked.
The "Codec" is set at: T.140
Once everything is properly set, click the "Save" button below.
Then click the "Next" button.
Another box pops up.
You can see a string of text inside the box below "Generated stream output string".
Delete this portion of the code: scodec=t140, (highlighted in yellow as shown below)
The string of text looks something like this:
:sout=#transcode{vcodec=h264,scale=Auto,scodec=t140,soverlay}:file{dst=C:\\Users\\kher\\Desktop\\La Luna With Subtitlesss.mp4,no-overwrite} :sout-keep
After you have deleted scodec=t140, this is how it looks like:
:sout=#transcode{vcodec=h264,scale=Auto,soverlay}:file{dst=C:\\Users\\kher\\Desktop\\La Luna With Subtitlesss.mp4,no-overwrite} :sout-keep
Finally click the "Stream" button below.
That's all.
Now it should start to embed the subtitles to the video clip.
While the streaming process is on, you can see the word "Streaming" below the movie title at the top of the VLC interface and the blue color band slowly lengthening across at the bottom.
Now you have to wait for it to permanently merge the subtitles together with the video.
The process takes some time, depending on the running time of your video or movie.
Once it is done, you just double click on the newly created file. (VLC orange color safety cone logo)
Now the subtitles is definitely permanently embed together with the video or movie.
If you click on the "Subtitle" on the menu, you find there is nothing on the "Sub Track".
In fact now you can delete away both the video and subtitles files.
Enjoy your movies....with subtitles.
- Here is another simpler and faster method to add subtitles permanently to videos/movies with free software MKVToolNix GUI.


