How to use FoxyProxy to gain access to blocked websites.
This tutorial was written back in the year 2013.
Since then FoxyProxy interface has changed drastically.
As a result, this tutorial is not suitable anymore.
You should follow this new tutorial, "How to access blocked websites with FoxyProxy guide".
NOTE: Ignore the tutorial below:
Find out how to use FoxyProxy to gain access to all those blocked websites now.
If you still have problem accessing certain blocked sites, after changing the DNS settings, then you should use a proxy as explained below:
This is what you need to do:
1. Go to: https://addons.mozilla.org/en-US/firefox/addon/foxyproxy-standard/
2. Click “Continue to Download”
3. It will take you to a new page. Now click “Add to Firefox”.
4. It will start to download. Once it has finished downloading. A box called Software Installation will pop up. Click on “Install Now”.
5. A menu box will pop up at the top of your screen with the remark “FoxyProxy will be installed after you restart Firefox”. Click “Restart Now”.
6. You should see a small blue color FoxyProxy icon at the address bar.
How to configure FoxyProxy
7. You need to configure or setup FoxyProxy before it can work.
8. First click on the fox head icon, a box will pop up. You should see a blue color band with "Proxy Name Default” next to it.
9. Click “Add New Proxy” which is on the right side of the box.
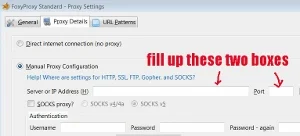
10. Another box called "FoxyProxy Standard – Proxy Settings” will pop up.
11. Select “Manual Proxy Configuration”.
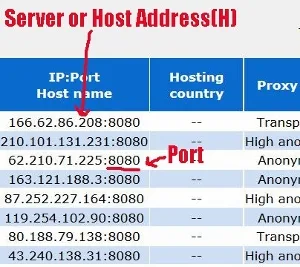
12. Now fill both the blank space for “Server or IP Address (H)” and “Port”. They are just digits or numbers.
13. You can get Server or IP Address and Port numbers from here: http://aliveproxy.com/proxy-list-port-8080/
Keep this site on your browser. Do not close it yet.
You may need it later when you find the "IP Address" which you have selected might NOT work with Google.14. From the list, just pick any one of IP address and try it out. As for the Port, the digits are: 8080.
15. After filling up the numbers or digits, select/click on “General” tab at the top of the box.
16. You should see a blue color box beside the words “Valid Color”.
17. Click on the blue box, a colored box will pop up.
18. Once you hover your cursor over the colored section of the box, it will change to a plus (+) sign. When it is out of the colored section, it changes to the normal cursor arrow sign.
19. What you do is you drag the color slider (small white triangles) along the narrow colorful strip on the right side of the box.
20. Select another color other than the default blue color. The purpose is to indicate the new proxy.
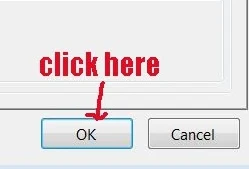
21. Now click the “OK” button below.
NOTE: If you have problem seeing the "OK" button at the bottom of the box, because you cannot reduce the size of the box small enough to see it. Then just press the "Enter" key from your keyboard.
22. A box will pop up showing you both the Default (blue color) and your newly setup proxy (with the color of your choice) as explained above.
23. To test out whether this particular proxy will work or not, go to “Select Mode:” located above and select your newly setup proxy.
24. Click on “Use proxy “xxx.xx.xxx.xx.xxx:8080" for all URLs.
25. Then click on the “Close” button.
26. Now the small fox icon at the address bar will change it color to the one which you have selected.
Now let's find out how to use it.
How to use FoxyProxy to access blocked websites
1. Now check whether your newly setup proxy can work with Google, by opening Google homepage.
2. If you cannot access Google, and have problem loading the page, it means your newly setup proxy CANNOT be used.
3. You need to replace a new IP address. The "Port" need not have to change. It is still set at: "8080".
Before you make any change, you need to revert it back to either: "Completely disable FoxyProxy" or Use proxy "Default" for all URLs at "Select Mode" first.
4. You do this by clicking on the small fox icon at the address bar.
5. A box pops up and you click on the box next to "Select Mode".
6. A menu drop down. Select and click on "Completely disable FoxyProxy" or Use proxy "Default" for all URLs.
7. Then click on the newly setup proxy.
8. Next click on the "Edit Selection" button on the right side of the box.
9. A box pops up.
10. Replace another new set of numbers to the "Server or IP Address (H).
11. Click the "Close" button or just press the "Enter" key.
12. Now go back to the "Select Mode" and and select/click back the newly replaced proxy.
13. Now click the "Close" button below.
14. Try opening Google homepage again.
15. If it works, then that newly replaced proxy can be used. Otherwise, you need to go back to step # 4 to replace another new set of numbers.
16. If you can open Google homepage, it means now you can access the blocked websites.
17. That's all.
NOTE: Remember to set back to either: Use proxy "Default" for all URLs or Completely disable FoxyProxy, when you want to access your usual websites.
Then click the "Close" button. You should see the blue color fox head or the fox head with a red slash line across at the address bar.
RELATED TIPS:


